The last couple of years we have hung our stockings with tacks on the wall. I have looked for stocking holders in the store that hang on the wall and that sit on top of a fire place/mantel but I haven't been able to find a set I like for a price that I like, plus most stocking holders that sit on top of a fire place/mantel are in sets of four and with our growing family, that won't be enough so I finally decided to make one. I have seen several variations of wood stocking holders on Pinterest but I liked the single piece of wood with a saying on it best. I searched for a tutorial for reassurance I was making it right but had trouble finding a tutorial so I decided I would share how I made our wood stocking holder. The wood stocking holder wasn't to hard to make and it looks good once hung on the wall.
Supplies:
- Wood Slice approx. 6"x36"
- Sander or Sand Paper
- Red Paint
- White Paint or White Paint Pen
- Paint Brush
- Gloss Spray or Wood Sealer
- 5 White Hooks (use the # in your family)
- Screw Driver
- Wall Hanger & Hammer
How To:
1. If your wood isn't the size you need, cut it to the size you'd like. I used a piece of 6"x36" old fence wood to make my stocking holder. The length of the wood depends on the size of your family, how many hooks you want, and how spread out you want the hooks to be. This wood size can fit four to six hooks.
2. Sand the piece of wood.
3. Paint the piece of wood any color you'd like. Let Dry.
I used red acrylic paint to paint my stocking holder. Other possible colors to use are green, white, red, light blue or a wood stain.
4. Choose a saying to put on the stocking holder. Write OR Print out the saying in the font and size you want to use. I used the saying, "And the stockings were hung...". Some other possible sayings you can use are:
- "And the stockings were hung..."
- "The stockings were hung..."
- "All the stockings were hung..."
- "The stockings were hung by the chimney with care"
- "Stockings hung with care"
- "Merry Christmas"
- "HO HO HO"
- "Twas the night before Christmas..."
- "Believe in the Magic"
- "He knows if you've been bad or good..."
- "Dear Santa, we've been good..."
- "Dear Santa, please define good..."
- "The (enter last name) family"
- Personalize it with your last name or first names
If you don't like any of the sayings you can add a Christmas related image such as snowflakes, Reindeer pulling Santa's sleigh, mistletoe, or leave it blank with just the hooks.
5. Transfer the words onto the wood. You can do this several different ways. In this case, I placed my words on top of the wood and centered them. I used a ball-point pen and gently traced over the words thus creating a small outline in the wood. If you look closely you can see the outline in the picture below.
*** Check out Step 4 in my blog, Growth Chart Ruler Tutorial, for another way you can transfer the words onto the wood.
6. Fill in the woods with white paint. Let Dry.
I used a white sharpie paint pen to fill in the words. The red paint bleed into the white a little so I had to go over my words with a thin paint brush and white acrylic paint. You can use any color you want to match the color of your wood.
7. Optional: Cover the wood stocking holder with a sealer. You can use a gloss spray such as Rust-Oleum Ultra Cover Clear Gloss Spray, Mod Podge or a wood sealer. The sealer will help seal the paint and make your stocking holder last longer. Depending on what sealer you choose, it will also add a shine to the wood.
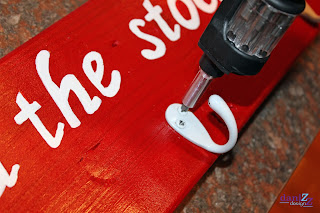
 8. Add the hooks.
The hook number will be for the number of stockings you want hung so if you have a family of four, add four hooks. Make sure to evenly space out the hooks.
I measured 4" from each end and attached a hook. I then did the math to evenly space out the other three hooks. Divide the length between hooks (27") by the number of hooks left (3) plus one (1). Then place the rest of the hooks evenly apart; in my case, 7" apart.
Example: Length between hooks ÷ (# hooks +1) = distance to space
My stocking holder: 27"÷ 4= 7"
I used 5 white hooks I bought from Lowes. You can use any color hook you want to match the colors of your wood stocking holder. The hooks usually come in white, black, brown, gold and silver. You can also use dresser draw knobs instead of hooks if you prefer.

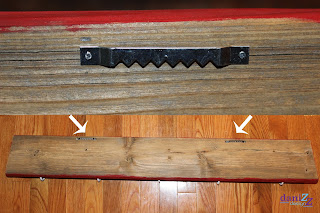
9. Add a wall hanger or two.
I used two sawtooth hangers and attached them to the back so I can hang my stocking holder every year. You can choose any hanging technique you prefer. You can add one huge sawtooth hanger, drill two holes in the wood and attach a ribbon/twine to hang your stocking holder, command picture hanging strips if you don't want holes in the wall, etc...
10. Hang your new wood stocking holder on the wall, add your stockings and wait for Santa to come and fill them with goodies!
The wood stocking holder will make a nice addition to anybody's Christmas decoration collection. The wood stocking holder is pretty easy to make and is a lot cheaper than buying stocking holders from the store. It looks great on the wall, especially once you add your stockings to it! The best thing is that you can personalize it any way you want. You can paint it to match other Christmas decor in your house, add your family's names or add a cute holiday saying. We have gotten so many complements on our stocking holder as I'm sure you will too!
Merry Christmas, Happy Holidays and Happy Crafting!!!


